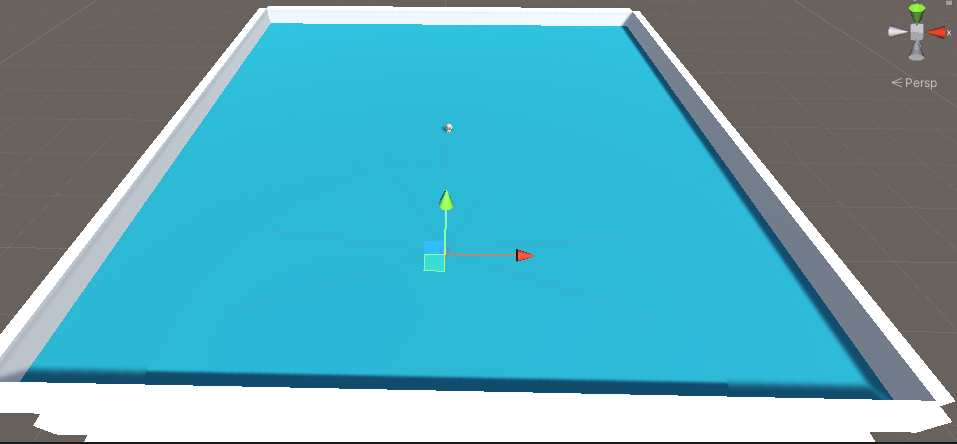
Stage를 이렇게 만든다.
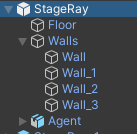
구조는 이런 식으로 한다.
Agent에 Mummy Ray Ctrl 스크립트를 만든다.
using System.Collections;
using System.Collections.Generic;
using UnityEngine;
using Unity.MLAgents;
using Unity.MLAgents.Sensors;
using Unity.MLAgents.Actuators;

public class MummyRayCtrl : Agent
{
    StageManager stageManager;
    Transform tr;
    Rigidbody rb;
    public override void Initialize()
    {
        MaxStep = 5000;
        stageManager = transform.root.GetComponent<StageManager>();
        tr = GetComponent<Transform>();
        rb = GetComponent<Rigidbody>();
    }

    // 에피소드 시작될 떄
    public override void OnEpisodeBegin()
    {
        stageManager.InitStage();

        // 물리엔진의 초기화
        rb.velocity = rb.angularVelocity = Vector3.zero;
        // 에이전트 위치 및 회전 값 변경
        tr.localPosition = new Vector3(Random.Range(-20, 20), 0.05f, Random.Range(-20, 20));
        tr.localRotation = Quaternion.Euler(Vector3.up * Random.Range(0, 360));
    }

    // 수치 관측할 때 사용되는 함수 레이만 쏠 경우엔 필요가 없음
    public override void CollectObservations(VectorSensor sensor)
    {
        // Vector 관측
    }

    // 브레인으로 부터 전달 받은 명령 (명령이 하달될 때마다 호출)
    public override void OnActionReceived(ActionBuffers actions)
    {
        // Discrete (0,1,2,3, ...)
        var action = actions.DiscreteActions;

        //Debug.Log($"[0] = {action[0]}, [1] = {action[1]}");

        Vector3 dir = Vector3.zero;
        Vector3 rot = Vector3.zero;

        // Branch 0 => action[0]
        switch (action[0])
        {
            case 1: dir = tr.forward; break;
            case 2: dir = -tr.forward; break;
        }

        // Branch 1 => action[1]
        switch (action[1])
        {
            case 1: rot = -tr.up; break;
            case 2: rot = tr.up; break;
        }

        // 머신러닝 환경에서는 업데이트문 같은게 fixedupadate와 같은 프레임으로 돔
        tr.Rotate(rot, Time.fixedDeltaTime * 200.0f);
        // velocityChange는
        rb.AddForce(dir * 1.5f, ForceMode.VelocityChange);

        // 지속적인 움직임을 유도하기 위한 마이너스 패널티
        AddReward(-1/(float)MaxStep);   //-1 / 5000 = -0.005f

    }

    // 개발자 테스트용 가상 명령 (외부 머신러닝에 연결하지 않았을 경우 브레인으로 가지 않기 때문에 연결 된 것처럼 시뮬레이션)
    public override void Heuristic(in ActionBuffers actionsOut)
    {
        /*
            Branch 0 = 0, 1, 2 => 3개
            Branch 1 = 0, 1, 2 => 3개
        */

        // discreteAction (이산) 방법을 사용할 때는 Branch 사용
        var action = actionsOut.DiscreteActions;
        // 이전 값 초기화
        action.Clear();

        //전진 / 후진 이동 - Branch 0 = (0: 정지, 1: 전진, 2: 후진)
        if (Input.GetKey(KeyCode.W))
        {
            action[0] = 1;
        }
        if (Input.GetKey(KeyCode.S))
        {
            action[0] = 2;
        }

        // 좌/우 회전 - Branch 1 = (0: 무회전, 1 왼쪽 회전, 2: 오른쪽 회전)
        if (Input.GetKey(KeyCode.A))
        {
            action[1] = 1;
        }
        if (Input.GetKey(KeyCode.D))
        {
            action[1] = 2;
        }
    }
    private void OnCollisionEnter(Collision collision)
    {
        if (collision.collider.CompareTag("GOOD_ITEM"))
        {
            AddReward(+1.0f);
            rb.velocity = rb.angularVelocity = Vector3.zero;
            Destroy(collision.gameObject);
        }

        if (collision.collider.CompareTag("BAD_ITEM"))
        {
            AddReward(-1.0f);
            EndEpisode();
        }

        if (collision.collider.CompareTag("DEAD_ZONE"))
        {
            AddReward(-0.01f);
        }
    }
}
public override void Initialize()
    {
        MaxStep = 5000;
        stageManager = transform.root.GetComponent<StageManager>();
        tr = GetComponent<Transform>();
        rb = GetComponent<Rigidbody>();
    }
Initialize는 한 번 실행되는 함수이다.
MaxStep으로 5000번 돌게끔 설정하고 Agent의 Transform과 RigidBody를 가져온다. stageManager는 StageManager 클래스를 가지고 온다. 해당 스크립트는 최상위인 StageRay에 붙어있다.
using System.Collections;
using System.Collections.Generic;
using UnityEngine;


public class StageManager : MonoBehaviour
{
    public GameObject goodItem;
    public GameObject badItem;


    [Range(10, 50)]
    public int goodItemCount = 30;
    [Range(10, 50)]
    public int badItemCount = 20;

    public List<GameObject> goodItemList = new List<GameObject>();
    public List<GameObject> badItemList = new List<GameObject>();

    public void InitStage()
    {
        // 기존에 생성된 아이템 삭제
        foreach(var obj in goodItemList)
        {
            Destroy(obj);
        }
        goodItemList.Clear();

        foreach(var obj in badItemList)
        {
            Destroy(obj);
        }
        badItemList.Clear();

        // GoodItem  생성
        for (int i = 0; i < goodItemCount; i++)
        {
            // 불규칙한 위치 생성
            Vector3 pos = new Vector3(Random.Range(-23.0f, 23.0f), 0.05f, Random.Range(-23.0f, 23.0f));

            // 불규칙한 회전값 생성
            Quaternion rot = Quaternion.Euler(Vector3.up * Random.Range(0, 360));
            goodItemList.Add(Instantiate(goodItem, transform.position + pos, rot, transform));
        }

        // BadItem  생성
        for (int i = 0; i < badItemCount; i++)
        {
            // 불규칙한 위치 생성
            Vector3 pos = new Vector3(Random.Range(-23.0f, 23.0f), 0.05f, Random.Range(-23.0f, 23.0f));

            // 불규칙한 회전값 생성
            Quaternion rot = Quaternion.Euler(Vector3.up * Random.Range(0, 360));
            badItemList.Add(Instantiate(badItem, transform.position + pos, rot, transform));
        }
    }
}
InitStage 메소드를 만들어 GoodItem 과 BadItem을 관리한다.
// 에피소드 시작될 떄
    public override void OnEpisodeBegin()
    {
        stageManager.InitStage();

        // 물리엔진의 초기화
        rb.velocity = rb.angularVelocity = Vector3.zero;
        // 에이전트 위치 및 회전 값 변경
        tr.localPosition = new Vector3(Random.Range(-20, 20), 0.05f, Random.Range(-20, 20));
        tr.localRotation = Quaternion.Euler(Vector3.up * Random.Range(0, 360));
    }
에피소드가 시작될 때 불리는 메소드 OnEpisodeBegin에 StageManager에 만들었던 메소드를 실행시킨다.
Agent의 velocity와 angularvelocity의 값을 초기화 해주고, 랜덤으로 회전을 주고 랜덤한 위치에 배치시킨다.
// 수치 관측할 때 사용되는 함수 레이만 쏠 경우엔 필요가 없음
    public override void CollectObservations(VectorSensor sensor)
    {
        // Vector 관측
    }
CollectionObservation 메소드는 주변환경을 관측 및 수집된 정보를 브레인한테 전달 한다.
하지만 이 메소드는 수치 관측할 때 사용되기 때문에 이번 예제에서는 사용하지 않는다.
// 개발자 테스트용 가상 명령 (외부 머신러닝에 연결하지 않았을 경우 브레인으로 가지 않기 때문에 연결 된 것처럼 시뮬레이션)
    public override void Heuristic(in ActionBuffers actionsOut)
    {
        /*
            Branch 0 = 0, 1, 2 => 3개
            Branch 1 = 0, 1, 2 => 3개
        */

        // discreteAction (이산) 방법을 사용할 때는 Branch 사용
        var action = actionsOut.DiscreteActions;
        // 이전 값 초기화
        action.Clear();

        //전진 / 후진 이동 - Branch 0 = (0: 정지, 1: 전진, 2: 후진)
        if (Input.GetKey(KeyCode.W))
        {
            action[0] = 1;
        }
        if (Input.GetKey(KeyCode.S))
        {
            action[0] = 2;
        }

        // 좌/우 회전 - Branch 1 = (0: 무회전, 1 왼쪽 회전, 2: 오른쪽 회전)
        if (Input.GetKey(KeyCode.A))
        {
            action[1] = 1;
        }
        if (Input.GetKey(KeyCode.D))
        {
            action[1] = 2;
        }
    }
시뮬레이션에서는 W와 S를 누르면 action[0]의 값이 변경되고, A와 D를 누르면 action[1]의 값이 변경된다.
W와 S를 누르지 않으면 0: 정지이며, A와 D를 누르지 않으면 0: 무회전을 뜻한다.
// 브레인으로 부터 전달 받은 명령 (명령이 하달될 때마다 호출)
    public override void OnActionReceived(ActionBuffers actions)
    {
        // Discrete (0,1,2,3, ...)  연속 수치일 경우 actions.ContinuousActions 사용
        var action = actions.DiscreteActions;

        //Debug.Log($"[0] = {action[0]}, [1] = {action[1]}");

        Vector3 dir = Vector3.zero;
        Vector3 rot = Vector3.zero;

        // Branch 0 => action[0]
        switch (action[0])
        {
            case 1: dir = tr.forward; break;
            case 2: dir = -tr.forward; break;
        }

        // Branch 1 => action[1]
        switch (action[1])
        {
            case 1: rot = -tr.up; break;
            case 2: rot = tr.up; break;
        }

        // 머신러닝 환경에서는 업데이트문 같은게 fixedupadate와 같은 프레임으로 돔
        tr.Rotate(rot, Time.fixedDeltaTime * 200.0f);
        // velocityChange는 질량의 차이와 관계없이 모든 리지드바디에 같은 속도 변화를 적용
        rb.AddForce(dir * 1.5f, ForceMode.VelocityChange);

        // 지속적인 움직임을 유도하기 위한 마이너스 패널티
        AddReward(-1/(float)MaxStep);   //-1 / 5000 = -0.005f

    }
이산 수치(Discrete)는 actions.DiscreteActions로 받아야 한다.
action[0]는 0이 아닌 값이 들어오면 방향을 앞이나 뒤로 하고,
action[1]은 0이 아닌 값이 들어오면 회전을 transform.up 방향 으로 시계 방향, 반시계 방향을 결정한다.
이후, 회전을 rot 방향으로 Time.filxedDeltatime * 200f 로 했는데 여기서 Time.Deltatme을 쓰지 않은 것은 머신러닝 환경에서는 FixedUpdate 처럼 돈다고 한다.
이동은 dir 방향으로 이동을 한다.
지속적인 움직임을 유도하기 위해 지속적으로 패널티를 준다. 패널티는 (-1 / maxStep) 의 값이 적당하다고 한다.
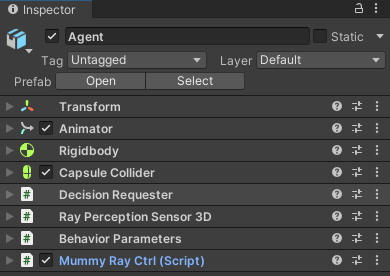
유니티로 돌아와서 Agent 컴포넌트를 이렇게 넣어준다.
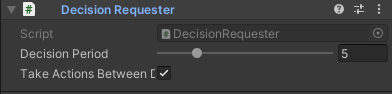
Decision Requester은 기본값을 사용했다,
Ray Perception Sensor 3D
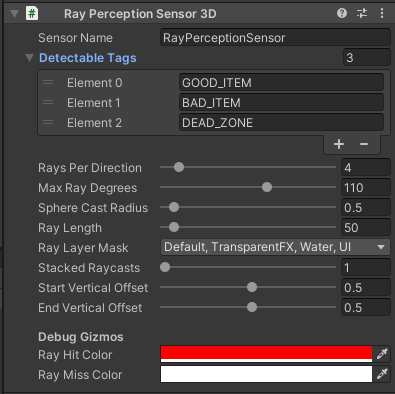
Ray방식을 사용할 때 필요한 컴포넌트인 Ray Perception Sensor 3D를 추가한다.
Detectable Tags는 부딪혔을 때 패널티와 리워드를 주는 오브젝트로 채운다
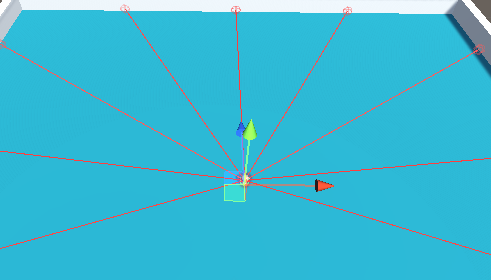
Rays Per Direction은 좌우에 몇개의 레이를 쏠 것인지에 대한 값이다.
Rays Per Direction
- Rays Per Direction의 값이 4일 때:
- Rays Per Direction의 값이 3일 때:

Max Ray Degree는 레이를 얼마나 퍼트릴 것인지에 대한 값이다.
Max Ray Degree
- Max Ray Degree 의 값이 110일 때:
- Max Ray Degree 의 값이 10일 때:
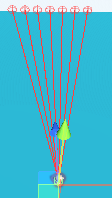
Start Vertical Offset과 End Vertical Offset을 올려서 겹침현상(Z-Buffer)을 방지한다.
Behavior Parameters

Behavior Name 을 MummyRay로 설정 Stacked Vectors를 한번 쌓이면 바로 값을 가져오게끔 한다.
앞 / 뒤 이동(action[0]) 과 좌 / 우 회전(action[1])의 값을 받을 때 이산 수치(Discrete)를 사용했기 때문에 DiscreteBrances에 2를 넣는다 (action[0], action[1])
Branch 0 Size 는 3이다 action[0] 에서 0은 멈춤, 1은 앞으로 이동 2는 뒤로 이동이기 때문에 총 3개의 크기가 필요하다.
Branch 1 Size도 역시 3이다 action[1] 에서 0은 무회전, 1은 좌회전 2는 우회전이기 때문이다.
C/Github/ml-agents/config/ppo에 있는 FoodCollector.yaml을 복사하여 MummyRay.yaml를 생성
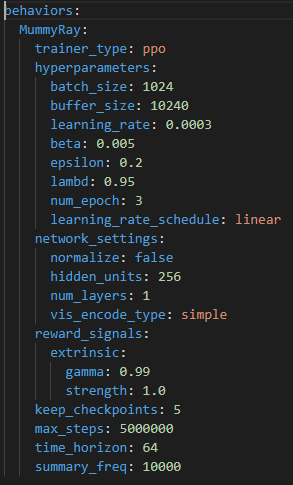
Behaviors name을 MummyRay로 바꾸고 저장
이후 Git bash를 열어 mlagents-learn ./MummyRay.yaml --run-id=MummyRay01 입력하여 실행한다.
'Unity > ML-Agents' 카테고리의 다른 글
| ML-Agents_3 (수치 관측) 인스펙터에 값 입력 (0) | 2022.05.03 |
|---|---|
| ML-Agents_2 (수치 관측) ml agent 메소드 정리 및 수치 관측 (0) | 2022.05.03 |
| ML-Agents_1 개발환경 구축 (0) | 2022.05.03 |


